Tuesday, September 28, 2010

Fall Pretties


I like to tear up silk flowers.  It's easy.  It's liberating.  It's legal.  (Well, it is legal if you do it in private, completely sober, with all your clothes on.) And, it's inspiring.  

This is the third time I've been inspired by tearing up silk flowers.  You can check out the other two times *here* and *here*.

And here... I made a Fall pillow for my Mom.  She loves Fall 
with lots of Fall doo-dads.


Here are some how-to pictures:


And some of the pretty vignettes my Mother has created for Fall...


Happy Fall!


******************************
Please *click here* and take a look around...


**************

*To see the parties I link to and to join in the fun, CLICK HERE!
I love to display the parties I'm attending 
on my post the day of the party!
I'm linking up to--


If you enjoyed this post (and, gosh, I hope you did) please BECOME A FOLLOWER!

Saturday, September 25, 2010

Public Confession # 1 -- I'm a total copy cat

So, cuff me....then go ahead and scroll down to see how easy it was to do!

  Most of the time when inspired by someone else's idea, I'll take that idea and make it my own, changing it here and there, tweaking it, 
using it as a jumping off point.  But this idea was way  
too perfect just like it was and I was forced to duplicate it, exactly, 
or as close as I could anyway.  

I think I came pretty. dang. close.

Theirs...
Southern Living
Now, if I can only figure out how to copy the cute kid!

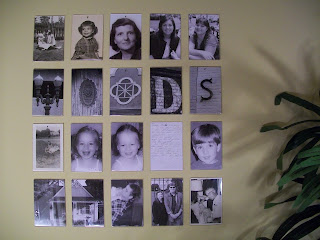
And Mine...


Not all of the pictures are of family members.  If you look close you can see my last name spelled out in architectural photographs taken by one of my lovely daughters.


Then there's a copy of a letter I wrote home when I was 8 and was spending time with my grandparents in the country.  I love this letter because it is proof positive that I was born to adorn everything -- I was telling my parents how my brother and I were decorating a goat pen!


This is our TV room with our wild recliners.  We love these things.
In fact, want to know where I blog?  Right here!


Here's how I did it...

The frames were only $1 each and I peeled the magnet off the back to save for another project. The inexpensive 4"x6" acrylic refrigerator frames and picture hangers came from Walmart - doesn't everything? 


Use the paper insert from one of the frames, fold it in half to find the center and mark the spot where you'll be drilling the holes about 5/8" down from the top. 
 
Slip this template into the frame and carefully drilled a hole, from the front to the back,  where you've marked the spot, using the same pattern for every frame.  The hole you drill will need to be larger than you might think so the frame will lay flat to the wall.  Oh, and make sure you're drilling at the top of each frame so your pics don't slip out...don't ask me why I know this.


Push the pointed end of each hanger into a piece of cardboard and spray paint them black.  I like these hangers because they'll show and they all go in at the same angle and will stick out the same amount. Use a level to measure and mark for hanging leaving 1" between the frames all the way around. 


******************************
Please *click here* and take a look around...


**************

*To see the parties I link to and to join in the fun, CLICK HERE!
I love to display the parties I'm attending 
on my post the day of the party!
I'm linking up to--

Thursday, September 23, 2010

My Etsy Store Grand Opening!


I've gone and done it.  I've opened an Etsy store!  
I've been thinking about doing this for over a year and 
just could not get around to it.  
Finally, I decided it was time to getter done.  
So, I did.  I gotter did!


So far, I only have practice paintings listed but I will be adding some variety soon.  Here's a peek at some of the paintings that are listed...


I'm Happy to say this one just found a new home!


Please *click here* and take a look around...

Often!
**************
*To see the parties I link to and to join in the fun, CLICK HERE!
I love to display the parties I'm attending 
on my post the day of the party!
I'm linking up to--


If you enjoyed this post (and, gosh, I hope you did) please BECOME A FOLLOWER!

Wednesday, September 22, 2010

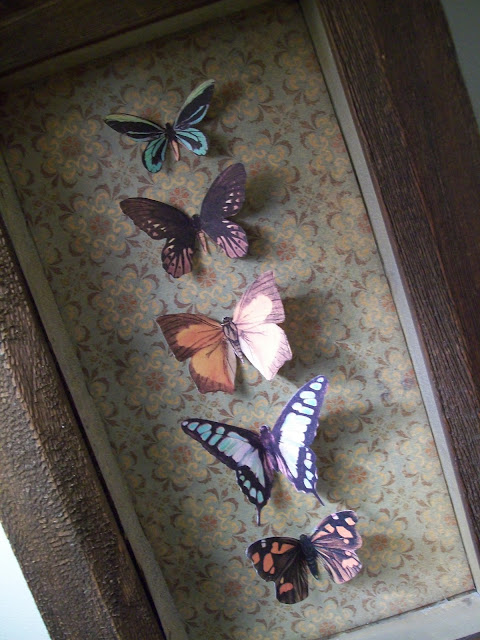
Faux Butterfly Specimen Box

Butterfly Specimen Box


I got this at Restore.  I like my Restore.  They're cheap ( this shadow box was only $1 -- marked down from $2 cuz that
was just way too much) and they have good junk. 
AND, they are always so stinkin' nice.  Really.


First, I needed to "undo" what was done here.  That's sand mixed with something way stronger than me. Tools needed? 
Two butter knives, an exacto knife, a hammer and sandpaper.  Then there's the other list of things I used that didn't work...


Once I had this all cleaned out it was pretty simple:
  1. Paint the inside walls with antique gold spray paint.  I thought this might help reflect light into the box.
  2. Line the back with scrapbooking paper.  Mine was leftover from a dining room project.
  3. Print vintage butterflies from The Graphics Fairy on card stock and cut out carefully.  I had to play around with the sizing a little bit.
  4. Fold butterfly wings up.
  5. Position butterflies in shadow box and glue in place.
  6. Replace glass front.


I'm on the lookout, now, for all the shadow boxes I can find. 
Get back, girls....


Oh, did I forget to say how much I love my 


Give Karen a visit -- She's pretty stinkin' nice, too!
*^*^*^*^*^*^*^*^*^*^*


If you enjoyed this post (and, gosh, I hope you did) please BECOME A FOLLOWER!