Pages

Saturday, March 26, 2011

Dog Silhouette Pillow

Our oldest daughter is in medical school.  We are very proud of her.  She has worked awfully hard to get where she is, 
weathering hundred hour days, sleepless nights, really gross anatomy and a 6-year-old study partner.  


And even though she has let none of this get the best of her, 
this just might...


Meet Jack.  Fifteen pounds of completely adorable, 
totally out-of-control dog flesh.  


Of course, she's in denial, and thinks it's going to work out.  I, on the other hand, have the job of pessimist -- what are mothers for?  But, I can still hear her, at 12 years old, telling me, "You're responsible for that dog if you bring it in this house!"

We'll see.  I won't mind one bit being proven wrong on this one though.


In the meantime, I've made my grandson (study partner extraordinaire) a pet of the tamer kind for his bed -- a "Jack" dog silhouette pillow similar to those I've seen in decorating magazines.


It was much easier to find a dog silhouette by googling "dog silhouette pictures"  than to get Jack to sit for a picture.  I enlarged the view and used a little cheat I've done before.  I taped my drop cloth fabric 
over my laptop screen and very lightly traced the image with a fine tip marker.  


I'm not recommending this...I'm just telling you how I do it...
it's your laptop... 


I traced and filled everything in with black markers -- how easy was that?  I like the "drawn on" look, myself.


Back at the computer, I typed "Jack" into a document, enlarged it to fit and cheated again by tracing directly from the screen.


This all works best in a dark-ish room.


I drew the border with a marker around the edge.  


There you have it -- 


***


I'll be linking up here:


*Under the Table and Dreaming
*Show and Tell Friday - My Romantic Home
*Frugal Friday - The Shabby Nest
The Friday Flair - Whipper Berry
Remodelaholic Friday - Remodelaholic
Feathered Nest Friday - French Country Cottage
Feature Yourself Friday - Fingerprints on the Fridge
Flaunt It Friday - Chic on a Shoestring Decorating


If you enjoyed this post (and, gosh, I hope you did) please BECOME A FOLLOWER!

Tuesday, March 22, 2011

Bird Lamp Tutorial

It's another bird post.  I'm at risk of an intervention, I know, but I have to show you how I (re)made this lamp.


I've done a couple of projects using this same process.

This one...
Click on the picture to see the details
And this one...

Click on the picture to see the details


It's fast.  And pretty easy.  

I'll show you again if you missed the other tutorials...


Color, circa 1987?  Shade, a little too shabby to be Chic?


After a good sanding and a nice coat of creamy white spray paint it was looking pretty good.


I found these gorgeous birds at The Graphics Fairy,  printed them out on card stock and carefully cut them out.  I like using card stock for decoupage projects.  It's easy to control.   It doesn't wrinkle up when you hit it with a little Mod Podge and there's no curling up and rolling away.


I played around with the placement of the birds.  I wish I could remember to do this before I paint on the limbs but, well,  that would be someone else's blog, now wouldn't it?


I have a nice assortment of Plaid paints I used for the limbs and leaves.  I get good coverage and I love the millions of colors.


I used Mod Podge (which I called Hodge Podge for years....sorry Plaid) to attach the pretty birds.  I brushed a good heavy coat on the back, pressed it onto the lamp, then brushed some on the front of the paper as well.


I washed the entire lamp with watered down brown paint for an aged look.  A good coat of clear spray paint, a little lamp shade love and there you have it -- another bird project because you just can't have too many of 'em.


 If you enjoyed this post (and, gosh, I hope you did) please BECOME A FOLLOWER!

Saturday, March 19, 2011

Recycled Newspaper Pots

I save seeds each year from my cutting garden for the next year.  These are some of my favorites...


 Peppermint Zinnias


Assorted Zinnias


  I've started some flower seeds today.  I'm thinking I should have done this sooner but.....well......wait a minute.......I'm thinking........

 I made newspaper pots to sow them in and get them started.  The pots are super easy to make, free, and earth friendly.  And once your seedlings are old enough to move out on their own you just pop them into the ground -- paper pot and all. 


You could get fancy (and expensive) with this project.  Purchased newspaper pot makers cost $25 or more.  Sure, they're cute...

Fancy Newspaper Pot Maker


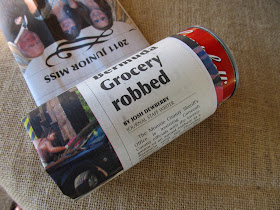
But they don't really make sense when I can whip out a can of Campbell's Soup that'll do the job for free and later sacrifice itself for dinner.


Recycled Newspaper Pot How To
 
Tear a single sheet of newspaper in half and fold in thirds.


Wrap the paper around the can about 1/4" from the top edge.  Not too tight -- you're going to have to slip it off.


Funny headline!  I said the pots were free -- not the soup!

Secure with tape.


Fold the bottom edge in like this...


then this...


Keep folding...


...and folding.


Secure with tape and slip it off the can.


I fill the pots with dirt (also free) from my compost bin and keep the seedlings moist, not soggy, until they're ready to plant, pot and all.


Here's a couple of cute options...


 Happy Gardening!!!


*


If you enjoyed this post (and, gosh, I hope you did) please BECOME A FOLLOWER!

Thursday, March 17, 2011

Bird Lamp -- 100th Post Giveaway!!!

This giveaway has ended...
Yeah baby!  This is my 100th post and I can hardly believe I made it this far. It's been fun...and sometimes hard -- with a life going on in the background that's had its ups and downs lately.  

But I've hung in.  I've made some nice friends and I've been inspired by all the very talented (and super funny) bloggers out there.

This is my big one-oh-oh post and I wanted to have a special giveaway.  


I grabbed this curvy lamp at Restore for its shape and not its color.  It was a funky shade of peachy-pink -- not my favorite color since 1987.  Now it's a pale cream, covered with pretty birds (from The Graphics Fairy, of course) and ready for its close up...


Are you feeling lucky?  It's going home with someone.
Maybe it'll be you!

Road Rules for getting up to 4 entries...
  1. Become a follower (or if you already are one) - leave a comment letting me know. 
  2. Leave any comment on this post.
  3. Grab my button and leave a comment letting me know.
  4. Blog about the giveaway on your blog linking back and leave a comment letting me know.
Good Luck!!!


This giveaway ends Sunday, March 27th  and the winner will be 
announced Tuesday, March 29th. 


If you enjoyed this post (and, gosh, I hope you did) please BECOME A FOLLOWER!